Wireless router
Linksus WRT54G wireless Router
-
Synopsis:
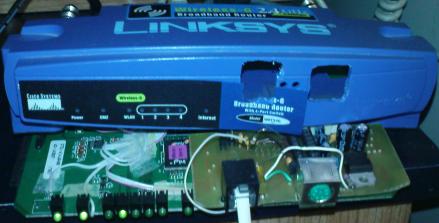
Linksys makes a marvelous wireless router, the WRT54G. It runs embedded linux, and the source is freely available. You can make an unauthorized and unsupported modification to add 1-wire support to the router. Basically, each router can act as a high-speed, intelligent 1-wire controller. Here's how!
-
The Hack
- Jim Buzbee very cleverly adds a mini distribution to the router. See his page for full explanation. This is a simple script that adds user tools, like busybox, telnet, etc to make the router accessible. The nice part is that the router is not harmed, a reset restores it to pristine state.
- OWFS is 1-wire filesystem for linux that allows 1-wire access for linux. It is quite light-weight, and will run from the ram disk.
- Chrstian Magnusson is modifying OWFS for the WRT54G, based on his experience getting owfs to run on coldfire processors. This is quite a feat considering that he is changing glibc to uClibc, processor architecture, memory and mutex handling, and filesystem organization.
-
Hardware
-
Serial ports
There are several discussion on the web for accessing the hardware of the WRT54G and adding serial ports. Rod Whitby
has a beautifully illustrated and annotated discussion. See also http://jdc.parodius.com/wrt54g/serial.html
Adding a serial adapter requires a serial to 1-wire adapter. See my list.
- Patryk has a recent version with full schematics
-
DS2480B
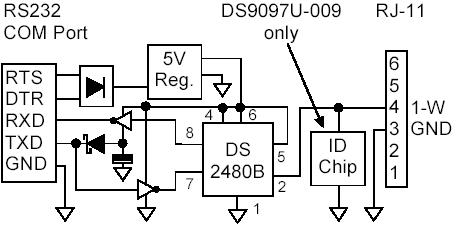
At least in theory, it should be possible to add the DS2480B directly to the board. Here is a rough schematic:
The idea behind this circuit is taking the serial outputs from the circuit board header (WRT54G v2 and WRT54GS, not earlier versions). The 3.3V is stepped up by the MAX883, and DS2480B negotiates with the 1-wire bus, the capacitors are for signal conditioning (from the MAX883 datasheet) and the diodes (you can use the DS9503) protect the circuit from attempts to drive the data line too low. Additional note: Rev4 of the circuit uses shottky diodes and a 7805 voltage regulator. Power source is from the power to the box, not the 3.3V on the serial header.
-
Circuit Improvements
David Lissiuk of Springbok writes:
I'd suggest the use of Shottky diodes for the line protection instead of IN4004 (faster response). Putting optocouplers and DC to DC in the circuit would protect the Linksys from anything that happened to the 1-wire side. (Maybe as an optional components?) The addition of switchable line filter on the 1-wire side of the DS2480 would be appropriate also to remove the need in some situations. Need to look closer at the Linksys for other suggestions.
- Shielding the serial cable (Alessio Sangalli, alesan@manoweb.com)
One major problem that can rise up when connecting a DS2480B directly with a 3.3V TTL serial port is that noise and the extreme 'weakness' of those serial ports can lead to communication problems. For this reason, the serial cable that connects the serial port of the router to the circuit must be kept as short as possible (10cm max) or shielded, with shielding connected to GND. In practice, it also depends on the router. For example, Linksys WRT54GL can use an unshielded 30cm cable without problems, while Asus WL500gP do require shielding.
- Another version (Alessio Sangalli, alesan@manoweb.com)
The usage of the chip DS9503 can protect the 1-wire part of the circuit. Moreover, as stated in Dallas' "Guidelines for reliable 1-Wire Networks", Appendix D, a RC filter may be used to improve the quality of the 1-Wire signal. Here a sample PCB (please note that RX must be connected to RX of the serial port and TX to TX! Do not cross the cabling. In fact, RX on DS2480B is an output and TX is an input!):
-
Available as Kit or Assembled

David Lissiuk has announced availability of a working circuit for modifyiong the Linksys router. He includes better protection, optional sensors, and a second serial port.
-
Hardware docs
- Linksys WRT54G User Guide
- Linksys circuit board serial header:
The pinout of JP1 on the Linksys PCB is as follows:
Pin 1: 3.3V Pin 2: 3.3V
Pin 3: Tx (ttyS1) Pin 4: Tx (ttyS0)
Pin 5: Rx (ttyS1) Pin 6: Rx (ttyS0)
Pin 7: NC Pin 8: NC
Pin 9: GND Pin 10: GND
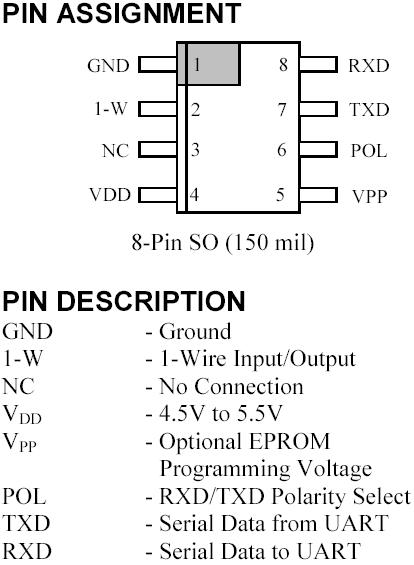
- DS2480B
- DS9097U
-
Packages with OWFS to OpenWRT Whiterussian RC5, RC6 or 0.9 distribution.
NOTE: These packages require you to have OpenWRT installed on your router.
- I can't recommend OpenWRT to users without any experience of Linux, shells-script experience. There are NO web-interface to configure all network settings, so you should have some knowledge and read the documentation, FAQ and examples at OpenWrtDocs, OpenWrtFaq and the forums.
- Set your router configuration BOOT_WAIT=1. Don't upgrade your firmware until this is done!!! The OpenWRT project has a good page which helps you set the BOOT_WAIT configuration.
- Download and install Kamikaze 6.
- Make sure to read the OpenWRT documentation on http://wiki.openwrt.org/OpenWrtDocs before you flash the new firmware. Go to the "Administration->Firmware" tab and select the path where you have the .bin file. Upgrading the firmware could take up to 5 minutes. DON'T reboot or power-off the router during this procedure!
- First time OpenWRT is booting (after the firmware-upgrade), it will setup and prepare the jffs2 partition. This could take 1-2 minutes. Be patient and wait....
- When filesystems are created, you have to reboot your router once more to mount the filesystems in read/write mode. This reboot is neccesary to do since you are going to install new packages. You should be able to login with telnet and reboot it manually when it's ready.
host> telnet 192.168.1.1
root@OpenWrt:/# reboot
- Login to your router add my repository http://owfs.sourceforge.net/openwrt/packages/ to your /etc/ipkg.conf
host> telnet 192.168.1.1
root@OpenWrt:/# echo "src owfs http://owfs.sourceforge.net/openwrt/packages" >> /etc/ipkg.conf
- Update the ipkg repository and install the packages
ipkg update
ipkg install ntpclient
ipkg install owfs
ipkg install temploggerd
(Note: libpthread, kmod-fuse, libfuse, fuse-utils, librrd1, rrdtool1, rrdcgi1 will also be installed due to dependencies)
(Note: ntpclient or rdate should set the date if the router reboots. If not, the graphs won't show correct date)
- Try starting owfs and temploggerd manually (after setting date):
/etc/init.d/S60ntpclient
run-owfs
run-temploggerd
(Default settings for the scripts could be changed in /etc/default/*)
- Visit http://192.168.1.1/temploggerd/ after the scripts has finished and the rrd-file is created (could take 30 seconds). You should now see a list of all 1-wire devices, and the links will display graphs of all temperature sensors.
If you want to change the generated web-pages, then you could edit the template files in /usr/share/temploggerd/templates/ before starting temploggerd. Some of the template-files are:
index.html.templ all_temperature.cgi.templ sensor_temperature.cgi.templ all.cgi.templ
- To upgrade all installed packages to the latest version, just run the commands:
ipkg update
ipkg install owfs owlib
- Since there are startup-scripts for all applications, you should be able to reboot your router and have owfs and temploggerd automatically restarted.
- All files generated from temploggerd are saved in
/var/lib/temploggerd/ as default. Those files are lost if router reboots since it's located in the ramfs partition. Therefor I added the config-parameters "backup_dir" and "backup_freq" in /etc/temploggerd.conf which tell temploggerd to copy all files from /var/lib/temploggerd/ to /opt/backup (in flash-disk) once per hour for example. This method will increase the lifetime of the flash-memory and give you the possibility to save the rrd-files if you reboot the router. You could of course make a cronjob to copy the files from /var/lib/temploggerd/ to /opt/backup/temploggerd/ for example, if you feel more comfortable with that. Remember that a startup-script should then copy the backup files to /var/lib/temploggerd/ before starting temploggerd.
-
Packages with OWFS on Kamikaze 7.07 distribution with 2.4-kernel.
NOTE: These packages require you to have Kamikaze-7.07 installed on your router.
- I can't recommend OpenWRT to users without any experience of Linux, shells-script experience. There are NO web-interface to configure all network settings, so you should have some knowledge and read the documentation, FAQ and examples at OpenWrtDocs, OpenWrtFaq and the forums.
- Set your router configuration BOOT_WAIT=1. Don't upgrade your firmware until this is done!!! The OpenWRT project has a good page which helps you set the BOOT_WAIT configuration.
- Download and install Kamikaze 7.07 with brcm-2.4 kernel. This is suiteable for WRT54G router and others. (wireless support doesn't work right now though)
- Make sure to read the OpenWRT documentation on http://wiki.openwrt.org/OpenWrtDocs before you flash the new firmware. Go to the "Administration->Firmware" tab and select the path where you have the .bin file. Upgrading the firmware could take up to 5 minutes. DON'T reboot or power-off the router during this procedure!
- First time OpenWRT is booting (after the firmware-upgrade), it will setup and prepare the jffs2 partition. This could take 1-2 minutes. Be patient and wait....
- When filesystems are created, you have to reboot your router once more to mount the filesystems in read/write mode. This reboot is neccesary to do since you are going to install new packages. You should be able to login with telnet and reboot it manually when it's ready.
host> telnet 192.168.1.1
root@OpenWrt:/# reboot
- Login to your router add my repository http://owfs.sourceforge.net/openwrt/kamikze/packages/ to your /etc/ipkg.conf
host> telnet 192.168.1.1
root@OpenWrt:/# echo "src owfs http://owfs.sourceforge.net/openwrt/kamikaze/packages" >> /etc/ipkg.conf
- Update the ipkg repository and install the packages
ipkg update
ipkg install owlib owfs
ipkg install temploggerd
(Note: libpthread, kmod-fuse-2-4, libfuse-2-4, fuse-utils-2-4, librrd1, rrdtool1, rrdcgi1 will also be installed due to dependencies)
(Note: ntpclient or rdate should set the date if the router reboots. If not, the graphs won't show correct date)
- Try starting owfs and temploggerd manually (after setting date):
run-owfs
run-temploggerd
(Default settings for the scripts could be changed in /etc/default/*)
- Visit http://192.168.1.1/temploggerd/ after the scripts has finished and the rrd-file is created (could take 30 seconds). You should now see a list of all 1-wire devices, and the links will display graphs of all temperature sensors.
If you want to change the generated web-pages, then you could edit the template files in /usr/share/temploggerd/templates/ before starting temploggerd. Some of the template-files are:
index.html.templ all_temperature.cgi.templ sensor_temperature.cgi.templ all.cgi.templ
- To upgrade all installed packages to the latest version, just run the commands:
ipkg update
ipkg install owfs owlib
- Since there are startup-scripts for all applications, you should be able to reboot your router and have owfs and temploggerd automatically restarted.
- All files generated from temploggerd are saved in
/var/lib/temploggerd/ as default. Those files are lost if router reboots since it's located in the ramfs partition. Therefor I added the config-parameters "backup_dir" and "backup_freq" in /etc/temploggerd.conf which tell temploggerd to copy all files from /var/lib/temploggerd/ to /opt/backup (in flash-disk) once per hour for example. This method will increase the lifetime of the flash-memory and give you the possibility to save the rrd-files if you reboot the router. You could of course make a cronjob to copy the files from /var/lib/temploggerd/ to /opt/backup/temploggerd/ for example, if you feel more comfortable with that. Remember that a startup-script should then copy the backup files to /var/lib/temploggerd/ before starting temploggerd.
-
Packages with OWFS on Kamikaze 7.07 distribution with 2.6-kernel.
NOTE: These packages require you to have Kamikaze-7.07 installed on your router.
- I can't recommend OpenWRT to users without any experience of Linux, shells-script experience. There are NO web-interface to configure all network settings, so you should have some knowledge and read the documentation, FAQ and examples at OpenWrtDocs, OpenWrtFaq and the forums.
- Set your router configuration BOOT_WAIT=1. Don't upgrade your firmware until this is done!!! The OpenWRT project has a good page which helps you set the BOOT_WAIT configuration.
- Download and install Kamikaze 7.07 with brcm47xx-2.6 kernel. This is suiteable for WRT54G router and others. (wireless support doesn't work right now though)
- Make sure to read the OpenWRT documentation on http://wiki.openwrt.org/OpenWrtDocs before you flash the new firmware. Go to the "Administration->Firmware" tab and select the path where you have the .bin file. Upgrading the firmware could take up to 5 minutes. DON'T reboot or power-off the router during this procedure!
- First time OpenWRT is booting (after the firmware-upgrade), it will setup and prepare the jffs2 partition. This could take 1-2 minutes. Be patient and wait....
- When filesystems are created, you have to reboot your router once more to mount the filesystems in read/write mode. This reboot is neccesary to do since you are going to install new packages. You should be able to login with telnet and reboot it manually when it's ready.
host> telnet 192.168.1.1
root@OpenWrt:/# reboot
- Login to your router add my repository http://owfs.sourceforge.net/openwrt/kamikze-2.6/packages/ to your /etc/ipkg.conf
host> telnet 192.168.1.1
root@OpenWrt:/# echo "src owfs http://owfs.sourceforge.net/openwrt/kamikaze-2.6/packages" >> /etc/ipkg.conf
- Update the ipkg repository and install the packages
ipkg update
ipkg install owlib owfs
ipkg install temploggerd
(Note: libpthread, kmod-fuse, libfuse, fuse-utils, librrd1, rrdtool1, rrdcgi1 will also be installed due to dependencies)
(Note: ntpclient or rdate should set the date if the router reboots. If not, the graphs won't show correct date)
- Try starting owfs and temploggerd manually (after setting date):
run-owfs
run-temploggerd
(Default settings for the scripts could be changed in /etc/default/*)
- Visit http://192.168.1.1/temploggerd/ after the scripts has finished and the rrd-file is created (could take 30 seconds). You should now see a list of all 1-wire devices, and the links will display graphs of all temperature sensors.
If you want to change the generated web-pages, then you could edit the template files in /usr/share/temploggerd/templates/ before starting temploggerd. Some of the template-files are:
index.html.templ all_temperature.cgi.templ sensor_temperature.cgi.templ all.cgi.templ
- To upgrade all installed packages to the latest version, just run the commands:
ipkg update
ipkg install owfs owlib
- Since there are startup-scripts for all applications, you should be able to reboot your router and have owfs and temploggerd automatically restarted.
- All files generated from temploggerd are saved in
/var/lib/temploggerd/ as default. Those files are lost if router reboots since it's located in the ramfs partition. Therefor I added the config-parameters "backup_dir" and "backup_freq" in /etc/temploggerd.conf which tell temploggerd to copy all files from /var/lib/temploggerd/ to /opt/backup (in flash-disk) once per hour for example. This method will increase the lifetime of the flash-memory and give you the possibility to save the rrd-files if you reboot the router. You could of course make a cronjob to copy the files from /var/lib/temploggerd/ to /opt/backup/temploggerd/ for example, if you feel more comfortable with that. Remember that a startup-script should then copy the backup files to /var/lib/temploggerd/ before starting temploggerd.